
INNOVATION
INNOVATION
electric dirt bike
Specs:
-
2.6KW 36v motor
-
Gen. 1 Nissan Leaf batteries, 10s 2p system, capacity less than 60 amp hours
-
BMS, no name designed for Nissan leaf cells
-
Frame 1980 Yamaha MX175, Drum brakes
-
Alltrax sp48225 Motor controller
The electric dirt bike project I am working on has the goal of creating a sustainable future. Because of this I decided I was going to reuse as many materials as possible for this project. Electric motors are more than twice as efficient as the theoretical maximum efficiency of conventional gasoline engine. Electric motors can achieve efficiency rating higher than 90% in most cases and they enable us to use clean energy for transportation. This combine with my engineering skill-set that I developed through repairing motorcycles led me to want to build an electric motorcycle. I wanted to be as sustainable and practical as possible when building the E-bike so I planned on using recycled materials for it. This both increases the sustainability of the bike and decreases the cost. The frame, wheels and suspension are from a 1980 Yamaha MX175 dirt bike. This was a bike I picked up when I was still learning the basics of wrenching on motorcycles. Its a smaller lighter motorcycle than many of the more modern options available to me and it was in a rather decrepit state which made it the most practical choice for this project. The motor is from a broken floor burnisher and the batteries are Gen. 1 Nissan leaf batteries that were part of a defective battery pack. The batteries on electric vehicles are composed of many individual battery cells and if one or two is broken then the whole pack doesn’t function. This means that there was something wrong with the battery as a whole, so Nissan, instead of trying to fix it, sold to someone who salvages wherever battery cells are usable from the pack. Two other components that are needed are a BMS (battery management system) and a motor controller. For the BMS I searched on craigslist and found someone local who was selling one that was suitable for my situation. As for the motor controller I was not able to find a used one so I purchased a controller from Alltrax. They are a very reputable company that manufactures their controller in the US. Now with all of my components sourced it was time to start building.
The electric dirt bike project I am working on has the goal of creating a sustainable future. Because of this, I decided I was going to reuse as many materials as possible for this project. Electric motors are more than twice as efficient as the theoretical maximum efficiency of a conventional gasoline engine. Electric motors can achieve an efficiency rating higher than 90% in most cases and they enable us to use clean energy for transportation. This combine with my engineering skill-set that I developed through repairing motorcycles led me to want to build an electric motorcycle. I wanted to be as sustainable and practical as possible when building the E-bike so I planned on using recycled materials for it. This both increases the sustainability of the bike and decreases the cost. The frame, wheels, and suspension are from a 1980 Yamaha MX175 dirt bike. This was a bike I picked up when I was still learning the basics of wrenching on motorcycles. It's a smaller lighter motorcycle than many of the more modern options available to me and it was in a rather decrepit state which made it the most practical choice for this project. The motor is from a broken floor burnisher and the batteries are Gen. 1 Nissan leaf batteries that were part of a defective battery pack. The batteries on electric vehicles are composed of many individual battery cells and if one or two is broken then the whole pack doesn’t function. This means that there was something wrong with the battery as a whole, so Nissan, instead of trying to fix it, sold it to someone who salvages wherever battery cells are usable from the pack. Two other components that are needed are a BMS (battery management system) and a motor controller. For the BMS I searched on craigslist and found someone local who was selling one that was suitable for my situation. As for the motor controller, I was not able to find a used one so I purchased a controller from Alltrax. They are a very reputable company that manufactures their controller in the US. Now with all of my components sourced it was time to start building.
Fitting the motor in the frame was pretty straightforward. I manufactured and welded three mounting points to secure the motor in the frame. Once the motor was in the frame the batteries had to go in, it was a close fit but they fit in the frame. After this, I was able to perform the first test run, which was mostly successful. The bike moved but did not accelerate fast enough, it was very sluggish. This was because the gear ratio from the motor to the rear wheel was far too high. Simply put, for every full revolution if the wheel the motor would have to turn 3.47 times. This proved to be too difficult for the motor. So my solution was to lower the gear ratio, this way the motor has to turn more times for every one revolution of the wheel which means it doesn’t draw as much power. I switched from a 15 tooth front sprocket and a 52 tooth rear sprocket to a 10 tooth front and a 52 tooth rear. This made the bike run perfectly. It accelerated at an acceptable pace and had a top speed of about 30 mph. This gave me the go-ahead to finish constructing the battery guards, reconnecting the rear brake, and a few other small things.
A battery guard is important because lithium-ion batteries are dangerous, they are more energy-dense than TNT. Lithium-ion batteries are considered the standard for Electric vehicles and pretty much everything else, from the battery in your phone to your Bluetooth speaker. The cage was pretty straightforward, build a metal railing around the batteries so if the bike is dropped the batteries do not take any damage. In addition to this, I needed to rework the rear brake system. On a conventional motorcycle, the rear brake is operated with your right foot because you use your left hand to operate the clutch. However the electric motor pushes out into where the rear brake lever would be, and it would make more sense to use your left hand to work the rear brake. The fix was simple, use a cable to actuate the brake with your left hand. The only thing I had to do was create and weld a small amount for the cable to slot into that attaches to the bike swingarm. This solution was very straightforward and elegant. If I’m being honest this is probably my favorite part about the bike.
Currently, the bike is still under development and I still have to gather some data about the amps drawn from the battery while accelerating and some other circumstances to optimize its performance. There are a few other aspects that need to be changed but this project is more of a proof of concept.


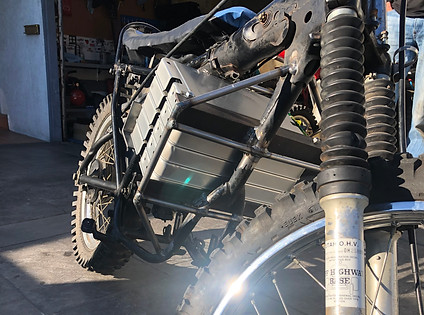

fig 2 (9th grade science fair)
Specs
-
Raspberry Pi Model 3 B
-
Battery 25000 Mah
-
Screen 4 inch
This project’s goal was to create a computer for educational purposes that has low cost, is compact, waterproof, and durable. The reason it's called Fig “2” is that when I was in elementary school I built a computer using an RPI (Raspberry Pi) and an old laptop screen and dubbed it the Fig. I thought it could only be fair to pay homage to the original RPI computer. For those who don’t know an RPI is a small computer that is about the size of a credit card and has many uses. The design process started with a simple goal, to create something durable, and easy to manufacture. I settled on using plastic as the material because of its durability, resistance to water, and low cost. For prototyping purposes, I used a 3D printer which can only print with a limited number of materials, whereas if it were to be manufactured it would most likely be constructed with ABS which is much more durable. For the screen, I settled on one that attached directly to the RPI. As for the keyboard and mouse, I found one that fit within the size I was going to use. The same parameter of size was the deciding factor for the battery. After considering all of these parameters I created several cases and tweaked the design till I had something usable. The cost was approximately 100$ which would be brought down considerably if this were to be mass-produced. The durability was not great because of the plastic it was printed in and the fact that the parts could be printed as a whole and had to be superglued together. However, the proof of concept was there.


Motorcycle repair
Bikes Worked On:
1973 XR75
1974 XR75
1977 XR75
1978 XR75
1981 MX175
1980 MX175
1934 IT200
1986 YZ250
1995 XR80
1996 KLX250
1996 KDX200
1997 KDX220
1986 XR250R
1990 RT180
1999 RM250
1999 300EXC
2002 KX250
2000 CR80
2002 CR80
2002 KX65
2003 KLX300 x2
2014 150SX
I started working on motorcycles because I was tired of spending so much time using screens. I’ve always enjoyed working with my hands so I decided one day to get a project motorcycle. From there it took off, I found that I had a knack for diagnosing and repairing dirt bikes. I would make money on the bikes I fixed and sold and use that money to buy more broken motorcycles. I remember the first engine I had to rebuild. It was a 1986 Honda XR250R that didn’t run. Diagnosing a non-running condition is usually straightforward. An engine needs three basic things to run, air/fuel mixture, spark, and compression. I found out after working on many of these old bikes that gas will expire. It's a common practice for gas providers to mix ethanol in with the gas to reduce smog. This has one downside, after sitting for many months or years the gas will start to gunge up. This will cause problems with the carburetor, which mixes air with fuel and delivers it to the combustion chamber. Once the carburetor was cleaned I tested if the spark plug, the device that ignites the fuel mixture, was sparking, which it wasn’t. There are only three components that control the spark, the stator, CDI box, and ignition coil. It's hard to test if the components are operating correctly so by the end of it I had to replace all three of them. After this, I found that the engine was burning oil, which is a sign that the piston rings are worn. Piston rings form a seal so that the combustion of the gasoline doesn’t escape the combustion chamber. However, I knew I had to pull the engine apart because there was a broken shifter shaft. After disassembling the engine some basic tasks should be done while it's disassembled. Such as lapping the valves, replacing valve guide seals, inspecting for wear, replace engine oil seals, and upon reassembly replace gaskets. After doing these things and reassembling the engine, it ran but not great, it had trouble starting once the engine was warmed up. Something to know about these high-performance engines is that the parameters for running change once the engine heats up. This happens because the metal surfaces expand slightly and this causes the fuel to atomize and combust faster. In addition to this when starting a cold engine there is a lever on the carburetor that will dump more fuel into the engine which makes the engine start easier. With these factors in mind, I found that the carburetor was set up incorrectly and was putting too much fuel into the engine when it was hot, which is why cold starting was easy but hot starting was not. After all of this work, the bike was running perfectly. After learning all of these things the rest of the bikes I built followed a very similar procedure.


